Tuesday, January 31, 2023

Call To Adventure

The 13th Greatest Board Game of all time is: Call To Adventure!

Call To Adventure is a story telling card game. Players begin with an Origin, a Motivation, and a Destiny. These base cards give you a foundation to build out a story of your heroic adventures. Cards are laid out in three rows, each row representing one of the landmarks mentioned above. You start by adding cards to your Origin. 


You are free to choose any card in the top row for this, but earning cards requires you to pass skill tests. Your starting cards and cards that you earn have symbols on them representing skills. To pass a test you need a number of successes. You gain these by casting rune stones. These are like dice, but with only 2 sides. They are pretty cool. 

Everyone has a basic set of three runes that they are able to use, plus you can use any runes matching symbols on your cards. If the test you are attempting requires a high dexterity to complete, you can cast dexterity runes along with your basic ones in order to pass the test, but only if you are showing those runes on the cards that you already have. 


by ImagineAllTheMeeple on Board Game Geek 

Call To Adventure is a very basic quest adventure type game. It's an overland adventure without the land, and a dungeon crawler without the dungeon. You just choose a card and try to pass a test. The joy comes in the way the different encounters work together to tell your story. It's the most streamlined adventure game that I've ever played and it's brilliant. Everything works, the tactile feel of the rune stones is super satisfying and the story you are able to tell by the end of the game feels epic and cool. 

That's why Call To Adventure is the 13th Greatest Board Game of all time! 

P.S. There is a Dungeons And Dragons themed version of Call To Adventure called, "Call To Adventure: Epic Origins." I haven't played that one, yet. But the game claims to allow you to convert the character that you've made into an official D&D character when you're done! That sounds awesome, and could push this game even higher up my list of favorites!!

Join the Facebook group to discuss this and other cool things! 

Or feel free to leave a comment below!


Monday, January 30, 2023

Happy Birthday, Fred Hembeck!

Fred Hembeck turns 70 today! My experience of Hembeck's cartooning is from the pages of DC Comics. Back when I was collecting comics as a kid, there was this one-page house ad designed to read like a newspaper, "The Daily Planet." Each month The Daily Planet would feature certain comics being sold that month, written like a news article. It was awesome! And, like all newspapers, the Daily Planet needed a comic strip. That's where Hembeck came in.

Back some time in the 90's, Hembeck would take commissions to recreate those old strips. I bought one as a gift for a friend. Sadly, Hembeck doesn't do that anymore. I'm sure its just too much to deal with these days. Anyway, I wish Fred a very Happy Birthday and share the strip that I had commissioned here. This isn't the commission (as said, that was given away as a gift) but a scan from the original comic book publication. 


Sunday, January 29, 2023

ROYALTIES (Part 2)

ROYALTIES TABLES

When generating effort on the Royalties Tables, remember to add $ (your Repute bonus) and that Royalty cards (A, K, Q & J) are trump.

You gain an item based on the total amount of effort that you generate.


[HD] Head Branch Items

Perform a Royalties $ Action and consult the table below:

$ Effort Base Item     [s]   [h]   [d]   [c] Keywords
  2-6    Hood          +1    +0    +0    +1
  7-11   Mail Coif     +0    +1    +1    +0
 12-16   Cap           +1    +1    +1    +1
 17-21   Helm          +0    +2    +2    +0
 22-27   Mask          +2    +1    +1    +2
 28-33   Full Helm     +0    +3    +3    +0
 34-39   Great Helm    +0    +4    +4    +0
    40+  Crown         +3    +2    +2    +3

[MH] Main Hand Branch Items

Perform an Absolute @ Action and consult the table below: 

(This action sends you to another table.)

 2♣ [MH-A]     2♦ [MH-B]     2♥ [MH-D]     2♠ [MH-F]
 3♣ [MH-A]     3♦ [MH-C]     3♥ [MH-D]     3♠ [MH-G]
 4♣ [MH-A]     4♦ [MH-C]     4♥ [MH-E]     4♠ [MH-G]
 5♣ [MH-A]     5♦ [MH-C]     5♥ [MH-E]     5♠ [MH-G]
 6♣ [MH-A]     6♦ [MH-C]     6♥ [MH-E]     6♠ [MH-G]
 7♣ [MH-A]     7♦ [MH-C]     7♥ [MH-E]     7♠ [MH-G]
 8♣ [MH-A]     8♦ [MH-C]     8♥ [MH-E]     8♠ [MH-G]
 9♣ [MH-B]     9♦ [MH-C]     9♥ [MH-E]     9♠ [MH-H]
10♣ [MH-B]    10♦ [MH-D]    10♥ [MH-F]    10♠ [MH-H]
 J♣ [MH-B]     J♦ [MH-D]     J♥ [MH-F]     J♠ [MH-H]
 Q♣ [MH-B]     Q♦ [MH-D]     Q♥ [MH-F]     Q♠ [MH-H]
 K♣ [MH-B]     K♦ [MH-D]     K♥ [MH-F]     K♠ [MH-H]
 A♣ [MH-B]     A♦ [MH-D]     A♥ [MH-F]     A♠ [MH-H]

[MH-A] Knives (slashing)

Perform a Royalties $ Action and consult the table below:

$ Effort Base Item     [s]   [h]   [d]   [c] Keywords
  2-6    Dirk          +0    +1    +0    +0
  7-11   Sickle        +0    +2    +0    +0
 12-16   Dagger        +0    +1    +1    +1
 17-21   Cimeter       +0    +2    +1    +1
 22-27   Stilletto     +0    +2    +1    +2
 28-33   Katar         +0    +4    +1    +1
 34-39   Blade         +0    +3    +2    +2
    40+  Kris          +0    +4    +3    +3

[MH-B] Swords (slashing)

Perform a Royalties $ Action and consult the table below:

$ Effort Base Item     [s]   [h]   [d]   [c] Keywords
  2-6    Short Sword   +0    +2    +1    +0
  7-11   Sabre         +0    +2    +1    +2
 12-16   Scimitar      +0    +3    +2    +1
 17-21   Long Sword    +0    +4    +1    +1
 22-27   Broadsword    +0    +5    +1    +1
 28-33   Flachion      +0    +4    +2    +2
 34-39   Claymore      +0    +8    +0    +2  N
    40+  Great Sword   +0    +10   +0    +2  N

Keywords

No Off Hand (N) - you cannot equip an off hand item while using this weapon.

Thursday, January 26, 2023

Abyss


The 14th greatest board game of all time is, Abyss!


Abyss – Uploaded by Jean_Leviathan – Board Game Geek


In Abyss players compete to take over as ruler of the undersea world. They do this by exploring the depths, requesting the support of the council, and recruiting lords. All of this represented by cards. Abyss is a card game with a central board that's used to make the card play more intuitive.


The central board works really well. When exploring the depths you play cards at the top of the board turning them face up one at a time until you find one that you like. (This card is then added to your hand.) In an interesting twist, you must offer each card flipped up to your opponents before you can take it for yourself. That's not as bad as it sounds, your opponents must pay you for the cards they take, and you can do the same thing to them on their turn.


When you finally pick a card, any cards that weren't chosen, go to the center of the board. These are organized by card type, and this represents the council. When you request support from the council, you go to the middle of the board and take any one stack of cards there. You can potentially get a lot of cards of one type, but the numbers on the cards will generally be of lower value.


All the cards that you're collecting act as currency for the action at the bottom of the board, recruit a lord. While the other cards in the game are mini-sized cards, the lords are big beautiful tarot sized cards. These provide you with special powers and victory points. You want these cards.


There are a few additional actions. At the beginning of your turn you can pay one pearl (Pearls are the other kind of currency in the game. Mainly you use them to pay other players during their explore the depths action, but they can also be used to help pay for recruiting lords.) to add a lord in an empty space at the bottom of the board. Lords cards aren't added automatically, unless a certain threshold is reached, then all empty spaces are filled at once. Usually, this isn't the best when it happens on your turn because it tends to help your opponents more than you. However, you do get two pearls when you trigger this as consolation.


That's an interesting thing about Abyss, you spend a lot of time exploring for cards you want in order to recruit lords, but both of these actions have the potential to help your opponent as much as yourself. This is known in the board game biz as "positive interaction." I love this kind of thing in games.


Once a player has recruited their seventh lord, this triggers the end of the game and the player with the most points wins. There are a few details that I left out, like the push your luck aspect to exploring the depths (You may have to face the Kraken!) and how most lords have key icons on them. When you collect three of these keys you must select a location board. These location boards grant victory points but they are placed on top of the lords who triggered them and those lords lose their powers. 


Abyss is a great card game. The game board keeps the decisions in the game organized and intuitive. The positive interaction in the game keeps everyone involved all the time, and the art on the tarot sized lords cards is beyond stunning. I may have neglected to mention how beautiful Abyss is. The game is loaded with beautiful paintings by french artist Xavier Collette, aka Coliandre, and it's all amazing!!


All of these great things come together to make Abyss the 14th greatest board game of all time!!


Join the Facebook group to discuss this and other cool things! 

Or feel free to leave a comment below!

(Except where noted, all images copyright Bombyx all rights reserved.)

Tuesday, January 24, 2023

Terraforming Mars: Ares Expedition

My number 15 favorite game of all time is: Terraforming Mars: Ares Expedition, which is the "card game version" of Terraforming Mars!


In this game players take the roles of corporations working together to tame the hostile environs of Mars. But, it's not cooperative. You are all working towards the same goal, but of course you want your corporation to be the most profitable.


In Ares Expedition, players have a personal player board to track things that they can contribute to the transformation of Mars into a habitable planet. You can contribute elements of heat to raise the temperature, plants to raise the oxygen, and well ... money, because more money helps everything. You manipulate the resources tracked on your player board by playing cards from your hand. All cards stay in front of you to provide ongoing benefits or just score you points, and all cards cost money to play.


In the center of the table is a shared board that represents the planet Mars itself. Here you spend your resource to actually raise the planet’s temperature, increase the oxygen, and create oceans. This part all feels very as players work together to terraform Mars. What the central board really is, is a progress tracker to trigger the end of the game. It all works really well.


Each turn players pick an action secretly and then reveal them. Then actions are completed in a specific order by both players at the same time. Simultaneous play means that while, Ares Expedition may be a “longish” game, there is very little down time, which is a great thing. Also, if you are a fan of direct player interaction, you won’t find any here. This may be a strike against the game for many, for us this is a huge plus. Finding combos is interesting, the deck contains over 200 cards, so there’s lots of variability and opportunity to explore different strategies.


Terraforming Mars: Ares Expedition is a great engine building game! There’s even a two-player cooperative mode that we may try out at some point, but for now the competitive game is great. Oh, and Bernie (our cat) likes it too!

Terraforming Mars: Ares Expedition is my number 15 favorite game of all time!

Join the Facebook group to discuss this and other cool things! 

Or feel free to leave a comment below!

Sunday, January 22, 2023

Royalties (Part 1)

You take a moment to catch your breath and recover from your battle with the skeletons. After a moment you survey the area and smile. It seems the skeletons might have left something of value behind.


What Are Royalties?

In a dungeon crawl adventure game like this, players fight monsters in order to gain treasure. Treasure is referred to in Royal Treasures as "Royalties." This is because Royalty cards - all those cards without numbers (A, K, Q & J) - are considered trump when taking the Royalty action.


In order to generate Royalties, gather up all cards and shuffle them together, then lay out a new tableau of 3 cards. Cards are "played" from your tableau to generate results on random Royalties tables. This is called a Royalties Action.


Royalties $ Action

The Royalties $ Action is boosted by your hero's reputation or Repute. In CTE Repute is like a currency that measures your hero's worth. For this reason we use the $ symbol to represent Repute and its coinciding Royalties Action. Hint: Repute and Royalties both begin with the letter R.


Equipment and Branches

Royalties are equipped to locations on your character called Branches. Each Branch can equip one Royalty. There are 11 Branches: [HD] head, [MH] main hand, [OH] off hand, [RF] ring finger (left), [RF] ring finger (right), [TS] torso, [WT] waist, [HA] hands, [FT] feet, [NK] neck, and [BK] back.


Base Repute $ Bonus

Your base Repute $ bonus is equal to the number of items that you have equipped. Right now, you have your club and your quilted armor. So, you have $2 (two Repute.) Since you can potentially equip up to 11 items, you can increase your bonus to $11 if you are able to equip an item to each of the 11 branches on your character. In addition magic items add to your Repute $ total for each magical property that they possess.


To perform a Royalties $ Action, play a card from your tableau and add any $ Repute bonuses to the effort. Royalty Cards: A, K, Q & J are trump.


Creating an Item

To create an item, first you need to determine the item's branch. To do this, you must perform an ABSOLUTE action.


Absolute Actions

Creating a new item begins with determining the item's branch. This requires a special kind of action called an ABSOLUTE action. When you perform an absolute action, you play a card not for effort, but for the card itself.


When taking an absolute action you choose a card from your tableau and play it. You don't add any modifier to the card, and there is no trump. Instead the card is referenced for its unique identity. This means that every absolute action will result in 1 out of 52 possible outcomes.


The Royalty Branch Table below calls for an Absolute Action to resolve. Absolute Actions are identified by the @ at symbol. Hint: "At" and "Absolute" both start with the letter A. (Think, "At face value.")


Table 2 - Royalty Branch @

(Perform an Absolute @ Action and consult the table below.)


2♣ [HD] 2♦ [OH] 2♥ [TS] 2♠ [FT]

3♣ [HD] 3♦ [OH] 3♥ [TS] 3♠ [FT]

4♣ [HD] 4♦ [OH] 4♥ [WT] 4♠ [FT]

5♣ [HD] 5♦ [OH] 5♥ [WT] 5♠ [FT]

6♣ [HD] 6♦ [RF] 6♥ [WT] 6♠ [NK]

7♣ [MH] 7♦ [RF] 7♥ [WT] 7♠ [NK]

8♣ [MH] 8♦ [RF] 8♥ [WT] 8♠ [NK]

9♣ [MH] 9♦ [RF] 9♥ [HA] 9♠ [NK]

10♣ [MH] 10♦ [TS] 10♥ [HA] 10♠ [BK]

J♣ [MH] J♦ [TS] J♥ [HA] J♠ [BK]

Q♣ [MH] Q♦ [TS] Q♥ [HA] Q♠ [BK]

K♣ [MH] K♦ [TS] K♥ [HA] K♠ [BK]

A♣ [OH] A♦ [TS] A♥ [FT] A♠ [BK]


The two letter code identifies a branch where the Royalty can be equipped. These branches are: [HD] head, [MH] main hand, [OH] off hand, [RF] ring finger, [TS] torso, [WT] waist, [HA] hands, [FT] feet, [NK] neck, and [BK] back.


Each of the ten branches has its own table listing the Royalties that can be equipped to that branch.

Thursday, January 19, 2023

The Castles of Burgundy

My number 16 favorite game of all time is The Castles of Burgundy by designer Stefan Feld. Stefan Feld is sort of board game designer royalty. In comic book terms it might be like saying, Steve Ditko (co-creator of Spider-Man), or in RPG terms saying, Dave Arneson (co-creator of D&D.) With over 30 board game designs to his credit, and most of them very well received, Stefan Feld has quite the track record, and The Castles of Burgundy is arguably his most popular game.


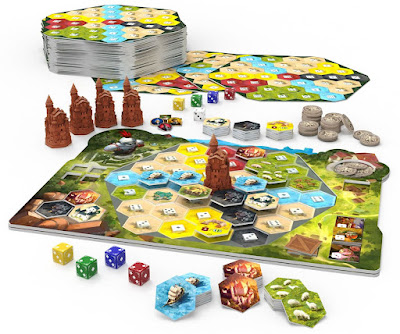
The Castles of Burgundy is a dice-placement game. On your turn you roll two dice and who ever is "first player" for the round also rolls a third die. That third die acts to provide some goods to players on their turn and this changes every round. Your dice provide you with actions you can take. You have a number of options here with the dice value determining, the what, where, or how much based on the actions that you choose.

Actions include: taking a settlement tile from the game board with a number matching your die, and placing it in a waiting area on your player board; taking a settlement tile from the waiting area on player board and placing in your "kingdom" in a hex with a number that matches your die; selling goods with a number matching your die, or taking workers that allow you to adjust the number on one of your dice.

Settlements have powers that will help you do more things or earn more victory points, and victory points are how you win the game. The Castles of Burgundy is an awesome kingdom building game. Julie and I love dice games and worker placement, The Castles of Burgundy is both. If the game has any negatives, it would be that it's not the prettiest game. The main board is at once drab and too busy.


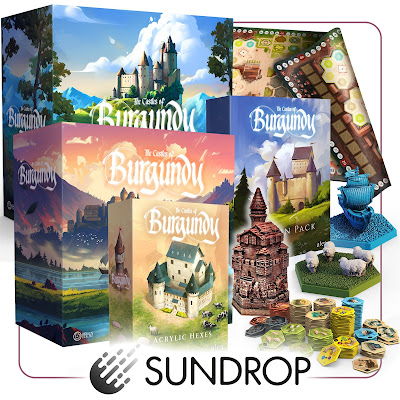
Luckily, Julie and I have backed a revamped super-version of the game on Game Found (a crowd funding site specifically for board game projects.) This version promises to improve the functionality of the original game components while making everything look a million times more awesome (and adding a new expansion to boot!)

I fully expect the new deluxified version of The Castles of Burgundy to push the game even further up the list of my favorite board games, but for now being the number 16 greatest game of all time isn't too bad!

Join the Facebook group to discuss this and other cool things! 

Or feel free to leave a comment below!

(Below are extra pictures from the Gamefound Campaign for those who are interested!)


Tuesday, January 17, 2023

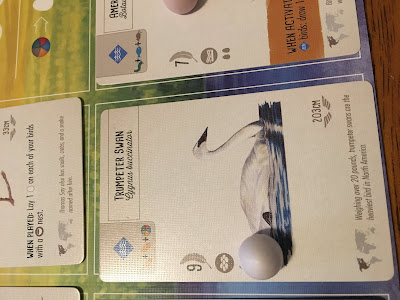
Wingspan

My number 17 favorite game of all time is Wingspan. I remember writing a rather involved review of Wingspan on Facebook back when we ("we," being myself and my wonderful wife, Julie) first played the game. So, I have decided to share that here.

***

Wingspan (from a Facebook post on October 18, 2020)

If you are a board game enthusiast, then you have heard of the board game: Wingspan. Wingspan has been the object of a lot of positive hype over the past year or so. It won the German hobby game of the year award in 2019 (the Kennerspiel des Jahres.) It also won the Board Game Geek board game of the year award (the Golden Geek Award) and the Dicetower Game of the Year Award for 2019. These are just a few of Wingspan's accolades.

The thing about hype is ... it can be misleading. Take the above mentioned awards. In 2019 the Dicetower award for best family game went to: Point Salad. I purchased Point Salad based on this, and Julie and I like Point Salad well enough, but is it award winning? I don't know. Not for me, I guess. So, hype: Wingspan gets so much of it, that I almost don't want to play it, just to be contrary. But, I gave in to the peer pressure and purchased Wingspan while on vacation in Michigan.

I don't know what I was thinking. Nothing can live up to the amount of hype that Wingspan has been getting. So, with ridiculously inflated expectations, I opened up Wingspan, and Julie and I played it last night.

And, then we played it, again ...

And again ...

And again.

OMG!!! WINGSPAN IS AMAZE-BALLS!!!! 

(AMAZE-EGGS?)

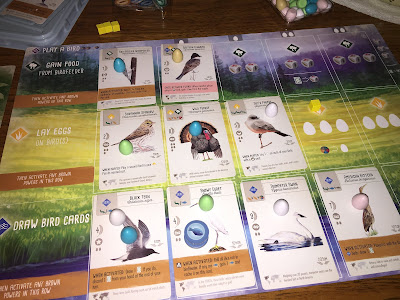
In Wingspan, players attract birds (a.k.a. cards) to their own personal bird sanctuaries (a.k.a. player boards.) You do this by putting out food (a.k.a. dice) in bird feeders (a.k.a. really cool birdhouse shaped dice tray.)

Each player's sanctuary (player board) is made up of three distinct habitats: woodlands, grasslands, and wetlands. Birds will only move into the habitats indicated on their cards, and each habitat will hold a maximum of five cards.


These three habitats are arranged on your player board as three rows of five columns each, creating a 3x5 grid. When you add a card (bird) to your player board, you place the card in the left most open column for the habitat (row) where that bird belongs.

The first card (bird) in a column must be purchased using the food cost shown on the card. (Food resources are rolled on dice in the aforementioned really cool birdhouse dice tray.) After that, later cards in the same row (habitat) will also cost you some eggs. (One egg for columns 2 and 3; two eggs for columns 4 and 5.) This reflects the growth of your habitats as the birds living there lay eggs and their populations grow.

This brings us to the actions that you can perform on your turn, and this is a really cool part of the game. Each row that represents a habitat also corresponds to a specific action that you can take on your turn.


The top row hosts the "Gather Food" action, which allows you to take food from the bird feeder. The middle row hosts the "Lay Eggs" action, which allows you to place a few eggs (cool little miniatures in Easter colors) onto some of your bird cards. The bottom row hosts the "Draw Cards" action, which allows you to put more cards in your hand, thereby increasing your options for attracting birds. (There is no limit to the number of cards you can have.)

Now for the cool bits: When you choose an action, the strength of that action (how much food, how many eggs, how many cards you get) is based on the information printed in the left most open column of that row. This means that as you add cards (birds) to your habitats, you automatically make these actions stronger.

But, wait ... there's more.

Many of the bird cards include special text that say, "When activated, do this thing ..." A bird card is "activated" when you take the action in the row of the habitat where that bird lives.

Let's say you take the "Gather Food" action. This action aligns with the top row of your player board which is the "Woodlands" habitat and you have two birds (cards) living here. Since the two birds occupy columns one and two, the strength of your "Gather Food" action comes from the first open column, column 3. This says that you can gather two foods.

However, in addition to getting the two foods, you now work your way from right to left back tracking in this row and performing any "When Activated" powers on your bird cards. Maybe one card allows you to get additional food when activated, and another card lays an egg in their bird nest when activated. All of this happens as a result of your single "Gather Food" action, because of the cards you have placed in this row (habitat.)

The engine building in Wingspan is cool and intuitive. Every bird that you add to a habitat has the potential to make the action in that row exponentially better. Perhaps best of all, the layout and design of the player board is such that the game play seems simple, while the vast variety of cards and special powers available is such that your options seem limitless. (There are 170 unique cards each featuring a different bird.)


The theme is so awesomely realized here. A bird's special power may be to lay eggs in another bird's nest, and this is based on the actual bird's behavior in nature. Birds of prey might capture mice or fish or other birds, and the mechanics of the special powers allow you to do this seamlessly. Carrion eating birds like Vultures have powers that activate when another player successfully hunts with their birds of prey. It all just makes so much sense. Every card featuring every bird has flavor text that describes something special about that bird.

Wingspan earns every ounce of praise and positive hype that it has received. To be honest, I am a little bit in awe of it. Wingspan is something of a masterpiece. In a year or so, should I get around to posting a board game top 100 again, I expect that Wingspan will land very near the top of the list.

***

And it has, landing at number 17!

Join the Facebook group to discuss this and other cool things! 

Or feel free to leave a comment below!

Sunday, January 15, 2023

Fight Some Skeletons

When you first pass through the gates and onto the cemetery grounds, things are peaceful. You briefly wonder if the stories of this "cursed cemetery" are nothing more than legend. Then suddenly, you see them - skeletal human remains! They walk, perhaps like they did in life, but certainly more quickly than they could have when burdened by living flesh.

They hiss at you even though they have no lungs with which to spit out air. Their maneuvering is deliberate, rapid and smart. They are trying to surround you. You grip your club tightly in your hand. Now it's time for a real fight!


Skeletons (x3) 

Me 8, Mi 6, Mo: Skeletons are vulnerable to Crushing Weapons. 


The two lines above comprise a monster's "stat block." The first line shows the name of the monster and the number of monsters appearing. In this case, combat is against three skeletons.


As with the Slime previously, the Skeletons have three stats: Menace, Might and Mojo. These are shown in order on the second line of the monster's stat block, one after the other. Me is the abbreviation for menace; Mi is the abbreviation for might, and Mo is the abbreviation for Mojo.


  • Menace is the target number you have to beat with effort when performing any action that is being opposed by the Skeletons. In this case that number is 8.


  • Might is the amount of life-force driving the skeletons to keep fighting. Each Skeleton has 6 Might. You will need to track this in your notes.


  • Mojo includes any special rules related to the Skeletons. Skeletons are vulnerable to crushing damage.


Vulnerablities and Resistances

When fighting monsters, all damage inflicted to a monster with a vulnerability to the type of damage that you are inflicting is doubled, while all damage inflicted on a monster with a resistance to the type of damage that you are inflicting is halved.

Fighting the Skeletons

Fight the skeletons using the rules for combat in the previous chapter. If you win, proceed to the next chapter: Royalties. If you lose, reset the fight and try again.


Example Battle (Setup + 3 Rounds of Combat)

Example - Setup

A - Create Tableau And Play Area: I draw the 8♦, the Q♣ and the 6♠. These are laid face up in front of me to form my tableau. I place the deck just above my tableau. This is the play area.


B - Place Monsters Into Threat And Shadow Areas: the encounter is with three skeletons. I draw three cards and place them one at a time to represent the skeletons. I draw a 2♥ to represent the first skeleton. Because the card is red, it goes in the threat area just above the play area.


The next card I draw is a 7♣. This is the second skeleton. Because the card is black, I place it above the 2♥. This is now the shadow area. The third and final skeleton is a 8♥. This goes in the threat area next to the 2♥.


Example - Round 1

1. Crossing ♣ (optional)

There are two skeletons in the threat area. I would prefer to deal with only 1 skeleton at a time. I need to try maneuver myself so that I am only facing one skeleton. Moving is done with the Crossing ♣ action.

It's important to remember that positioning in CTE is relative and that the battlefield is fluid. The act of movement using the Crossing ♣ action is abstracted. Your movement on the battlefield is represented by shifting monster cards from one area to another.

The Crossing ♣ action allows you to change the position of one monster from one area to another. This represents your movement versus the monsters' movements as you each maneuver to achieve the optimal position.

A monster's ability to do pretty much anything is represented by their menace. In order to out maneuver them with my Crossing ♣ action, I will need to meet or exceed their menace of 8.

The Q♣ like all Royalty cards, has a value of 5. My quilted armor grants a +1♣ bonus. This gives me a total of 6, which isn't high enough, but the suit of ♣ is trump for the Crossing ♣ action.

Trump means that I can flip the top card of the deck and add it to my played card. I play the Q♣ and then flip the top card, a 5♠.
Adding the 5 to my previous total of 6 gives me a final total of 11. 11 is greater than the skeleton's menace of 8. I successfully out maneuver one skeleton leaving them behind in the shadow area. (I move the 2♥ to the shadow area.)
I now need to draw a new card to refill my tableau area. I draw a J♠ to replace the Q♣

Hint: If you do not want to perform a Crossing ♣ action because all monsters are where you want them, you can still choose to perform the action and intentionally play a low card that you know will fail in order to draw a new card into your tableau for use later.

Step 1. Crossing ♣ was optional. You did not have to play a card during that step. All other combat steps are required. You must attempt to attack a monster if you can. You are required to play a card, even if you know that the card will not succeed in performing the action. Time for step 2.

2. Hitting ♥ or Shooting ♠

My club is a melee weapon because it doesn't have the "ranged" keyword. That means my attack uses the Hitting ♥ action. I don't have any ♥ in hand. So, no option to play trump for the Hitting ♥ action. My club grants me +2♥, which will increase the effort for any Hitting ♥ action by 2.

If I play my highest card: 8♦, the total is 10. That will inflict 2 damage on the skeleton. 10 effort - 8 menace = 2 damage. Because the skeleton is vulnerable to crushing damage, which is the kind of damage that my club inflicts, I will inflict the double of 2, or 4 damage.

4 damage is great, but it is not enough to destroy the skeleton which has a might of 6.
I can do this and leave myself open to attack, or I can save my 8♦ to defend. The 8♦ is guaranteed to succeed against an attack by the skeleton. If I play the 8♦, then I won't have it to play later, and I might take damage.

When I take damage, I lose the ability to play one of the cards in my tableau, which is major. I decide to bide my time and play it safe.
I play the 6♠.

(This is a mistake, I should have played my lowest card, the J♠ and saved the 6♠ for later - the J♠ has an effort value of 5, which is one less than the 6♠. I was so concerned with whether to play or to reserve the 8♦, that I played the wrong card. Sometimes you will make mistakes and play a less than optimal card. That's okay. It's all part of the game.)

The 6♠ gives an effort of 6. I add the +2♥ Hitting bonus from my club. This adds up to 8 and is just equal to the Menace of the Skeleton. 8 effort, minus 8 menace, equals 0. The skeleton doesn't take any damage. The fact that the Skeleton is vulnerable to crushing damage doesn't help because 0 doubled is still 0.

I draw a new card to refill my tableau. I draw a 3♠. I would not have been able to defend against the coming attack with that card. I made the right choice by saving the 8♦.

3. Defending ♦ Against Monster Attacks

The skeleton 8♥ remains in the threat zone and attacks me. I need to perform a Defending ♦ action. Fortunately, I have just the card that I need. I play the 8♦, and because it is trump for the Defending ♦ action, I flip the top card of the deck to add to it. The flipped card is a 4♦, because this is also trump for the Defending ♦ action, I flip another card 5♣.
My quilted armor grants +2♦ which I can add to the Defending ♦ action. I add the bonus for my armor to the original card played and the two cards that I flipped. +2♦ (armor), +8♦ (played card), +4♦ (1st trump card), +5♣ (2nd trump card) = 19.
19 is well above the 10 that I needed. The skeleton's attack was successfully defended against.
I draw a new card (4♠) to refill my tableau.

4. Resolve Damage

Since the skeleton attack against me failed, I have no damage to resolve and move on to the next step.

5. Monsters Move

I begin with 2♥ skeleton currently in the shadow area. I draw a 2♦ - red! I move the skeleton to the threat area and place the 2♦ on the discard pile.
For the 7♣, I draw a 4♥ - red. I move the 7♣ to the threat area.
Finally, for the 8♥ I draw a 9♠ - black. I move the 8♥ back to the shadow area.

Example - Round 2

1. Crossing ♣ (optional)

Back to the top of the sequence to start a new round and I'm in trouble. I don't have any trump cards and nothing high enough to beat an 8 (menace of the skeletons.)
I play the 3♠ and hope that I draw something useful. I draw a 10♦ which will help in defense, but I was really hoping to draw a heart.

2. Hitting ♥ or Shooting ♠

Okay, I can use my highest card, the 10♦ to attack or save it for defense. If I attack with this card, I will add +2♥ Hitting bonus for a total of 12. That is four greater than the Skeleton's menace of 8. That would cause 4 points of damage, but because my club is a crushing weapon and Skeletons are vulnerable to crushing damage, I get to double the 4 damage, inflicting 8 damage instead!
The Skeletons have a Might of 6. The 8 damage is enough to defeat a skeleton. That's what I will do! I play the 10♦ to defeat one of the skeletons. I move the skeleton represented by the 2♥ to the discard pile and draw a new card (K♥) for my tableau.

3. Defending ♦ Against Monster Attacks

The skeleton represented by the 7♣ is in the threat area and attacks. The best effort that I can achieve with the cards that I have is 7. (5 for either of the Royalty (face cards) +2♦ for my armor.)
That's not enough to match the Skeleton's menace of 8. I play my lowest card, the 4♠ and draw a new card (J♣) for my tableau.

4. Resolve Damage

I did not successfully defend against an attack against me. I must suffer damage. To do this, I must select one of the cards in my tableau and flip it face down. The card still takes up a space in my tableau, but I cannot play a face down card. The J♣ is good for the Crossing ♣ action, and the K♥ is good for the Hitting ♥ action. I flip over the J♠.

5. Monsters Move

Two skeletons remain. I begin with the skeleton represented by the 8♥ currently in the shadow area. I draw a 6♥ - red. The skeleton moves to the threat area. Now for the skeleton represented by the 7♣. I draw a 8♠ - black. That skeleton moves to the shadows.

Example - Round 3

1. Crossing ♣ (optional)

I like the cards in my tableau and the skeletons are right where I want them. So, I skip this optional step.

2. Hitting ♥ or Shooting ♠

I've been waiting for the chance to Hitting ♥ using a trump card. I play the K♥ and flip over the top card of the deck. I get the A♠. Both the A♠ and the K♥ are Royalty. All Royalty is worth 5 each, together they give me 10 effort. To this I add the +2♥ Hitting bonus for my club, bringing the total effort to 12.
Subtracting the skeleton's menace of 8 from my total effort of 12 leaves 4. Just like before this damage is doubled, bringing the total damage to 8 and destroying the Skeleton.

I discard the 8♥ and draw a new card to bring my tableau back up to 3 cards. I draw the K♦. I would have preferred another heart (or a really high numbered card.) But, the K♦ is good defense. So, I am feeling confident.


3. Defending ♦ Against Monster Attacks

No monster attacks since the only skeleton left is in the shadow area.

4. Resolve Damage

Since I was not attacked, I have no damage to resolve.

5. Monsters Move

I draw a A♥ - red. The skeleton moves to the threat area.