When you first pass through the gates and onto the cemetery grounds, things are peaceful. You briefly wonder if the stories of this "cursed cemetery" are nothing more than legend. Then suddenly, you see them - skeletal human remains! They walk, perhaps like they did in life, but certainly more quickly than they could have when burdened by living flesh.
They hiss at you even though they have no lungs with which to spit out air. Their maneuvering is deliberate, rapid and smart. They are trying to surround you. You grip your club tightly in your hand. Now it's time for a real fight! Skeletons (x3)
Me 8, Mi 6, Mo: Skeletons are vulnerable to Crushing Weapons.
The two lines above comprise a monster's "stat block." The first line shows the name of the monster and the number of monsters appearing. In this case, combat is against three skeletons.
As with the Slime previously, the Skeletons have three stats: Menace, Might and Mojo. These are shown in order on the second line of the monster's stat block, one after the other. Me is the abbreviation for menace; Mi is the abbreviation for might, and Mo is the abbreviation for Mojo.
Vulnerablities and Resistances
When fighting monsters, all damage inflicted to a monster with a vulnerability to the type of damage that you are inflicting is doubled, while all damage inflicted on a monster with a resistance to the type of damage that you are inflicting is halved.
Fighting the Skeletons
Fight the skeletons using the rules for combat in the previous chapter. If you win, proceed to the next chapter: Royalties. If you lose, reset the fight and try again.
Example Battle (Setup + 3 Rounds of Combat)
Example - Setup
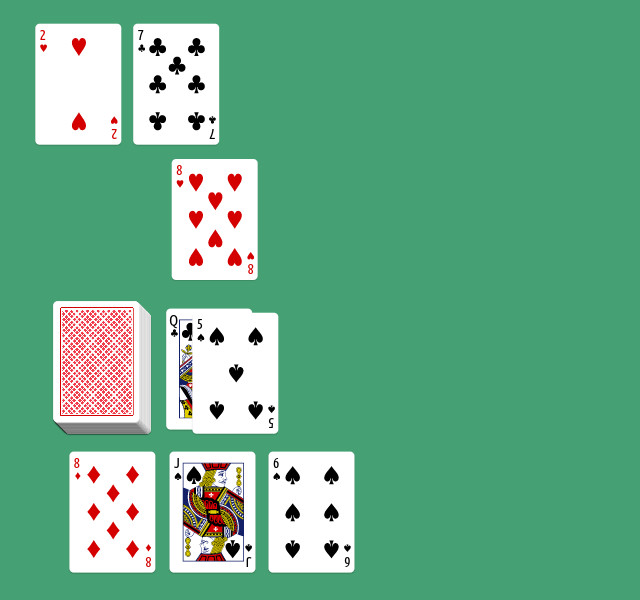
A - Create Tableau And Play Area: I draw the 8♦, the Q♣ and the 6♠. These are laid face up in front of me to form my tableau. I place the deck just above my tableau. This is the play area.
B - Place Monsters Into Threat And Shadow Areas: the encounter is with three skeletons. I draw three cards and place them one at a time to represent the skeletons. I draw a 2♥ to represent the first skeleton. Because the card is red, it goes in the threat area just above the play area.
The next card I draw is a 7♣. This is the second skeleton. Because the card is black, I place it above the 2♥. This is now the shadow area. The third and final skeleton is a 8♥. This goes in the threat area next to the 2♥.
Example - Round 1
1. Crossing ♣ (optional)
There are two skeletons in the threat area. I would prefer to deal with only 1 skeleton at a time. I need to try maneuver myself so that I am only facing one skeleton. Moving is done with the Crossing ♣ action.
It's important to remember that positioning in CTE is relative and that the battlefield is fluid. The act of movement using the Crossing ♣ action is abstracted. Your movement on the battlefield is represented by shifting monster cards from one area to another.
The Crossing ♣ action allows you to change the position of one monster from one area to another. This represents your movement versus the monsters' movements as you each maneuver to achieve the optimal position.
A monster's ability to do pretty much anything is represented by their menace. In order to out maneuver them with my Crossing ♣ action, I will need to meet or exceed their menace of 8.
The Q♣ like all Royalty cards, has a value of 5. My quilted armor grants a +1♣ bonus. This gives me a total of 6, which isn't high enough, but the suit of ♣ is trump for the Crossing ♣ action.
Trump means that I can flip the top card of the deck and add it to my played card. I play the Q♣ and then flip the top card, a 5♠.
Adding the 5 to my previous total of 6 gives me a final total of 11. 11 is greater than the skeleton's menace of 8. I successfully out maneuver one skeleton leaving them behind in the shadow area. (I move the 2♥ to the shadow area.)
I now need to draw a new card to refill my tableau area. I draw a J♠ to replace the Q♣
Hint: If you do not want to perform a Crossing ♣ action because all monsters are where you want them, you can still choose to perform the action and intentionally play a low card that you know will fail in order to draw a new card into your tableau for use later.
Step 1. Crossing ♣ was optional. You did not have to play a card during that step. All other combat steps are required. You must attempt to attack a monster if you can. You are required to play a card, even if you know that the card will not succeed in performing the action. Time for step 2. 2. Hitting ♥ or Shooting ♠
My club is a melee weapon because it doesn't have the "ranged" keyword. That means my attack uses the Hitting ♥ action. I don't have any ♥ in hand. So, no option to play trump for the Hitting ♥ action. My club grants me +2♥, which will increase the effort for any Hitting ♥ action by 2.
If I play my highest card: 8♦, the total is 10. That will inflict 2 damage on the skeleton. 10 effort - 8 menace = 2 damage. Because the skeleton is vulnerable to crushing damage, which is the kind of damage that my club inflicts, I will inflict the double of 2, or 4 damage.
4 damage is great, but it is not enough to destroy the skeleton which has a might of 6.
I can do this and leave myself open to attack, or I can save my 8♦ to defend. The 8♦ is guaranteed to succeed against an attack by the skeleton. If I play the 8♦, then I won't have it to play later, and I might take damage.
When I take damage, I lose the ability to play one of the cards in my tableau, which is major. I decide to bide my time and play it safe.
I play the 6♠.
(This is a mistake, I should have played my lowest card, the J♠ and saved the 6♠ for later - the J♠ has an effort value of 5, which is one less than the 6♠. I was so concerned with whether to play or to reserve the 8♦, that I played the wrong card. Sometimes you will make mistakes and play a less than optimal card. That's okay. It's all part of the game.)
The 6♠ gives an effort of 6. I add the +2♥ Hitting bonus from my club. This adds up to 8 and is just equal to the Menace of the Skeleton. 8 effort, minus 8 menace, equals 0. The skeleton doesn't take any damage. The fact that the Skeleton is vulnerable to crushing damage doesn't help because 0 doubled is still 0.
I draw a new card to refill my tableau. I draw a 3♠. I would not have been able to defend against the coming attack with that card. I made the right choice by saving the 8♦.
3. Defending ♦ Against Monster Attacks
The skeleton 8♥ remains in the threat zone and attacks me. I need to perform a Defending ♦ action. Fortunately, I have just the card that I need. I play the 8♦, and because it is trump for the Defending ♦ action, I flip the top card of the deck to add to it. The flipped card is a 4♦, because this is also trump for the Defending ♦ action, I flip another card 5♣.
My quilted armor grants +2♦ which I can add to the Defending ♦ action. I add the bonus for my armor to the original card played and the two cards that I flipped. +2♦ (armor), +8♦ (played card), +4♦ (1st trump card), +5♣ (2nd trump card) = 19.
19 is well above the 10 that I needed. The skeleton's attack was successfully defended against.
I draw a new card (4♠) to refill my tableau.
Since the skeleton attack against me failed, I have no damage to resolve and move on to the next step.
5. Monsters Move
I begin with 2♥ skeleton currently in the shadow area. I draw a 2♦ - red! I move the skeleton to the threat area and place the 2♦ on the discard pile.
For the 7♣, I draw a 4♥ - red. I move the 7♣ to the threat area.
Finally, for the 8♥ I draw a 9♠ - black. I move the 8♥ back to the shadow area.
1. Crossing ♣ (optional)
Back to the top of the sequence to start a new round and I'm in trouble. I don't have any trump cards and nothing high enough to beat an 8 (menace of the skeletons.)
I play the 3♠ and hope that I draw something useful. I draw a 10♦ which will help in defense, but I was really hoping to draw a heart.
2. Hitting ♥ or Shooting ♠
Okay, I can use my highest card, the 10♦ to attack or save it for defense. If I attack with this card, I will add +2♥ Hitting bonus for a total of 12. That is four greater than the Skeleton's menace of 8. That would cause 4 points of damage, but because my club is a crushing weapon and Skeletons are vulnerable to crushing damage, I get to double the 4 damage, inflicting 8 damage instead!
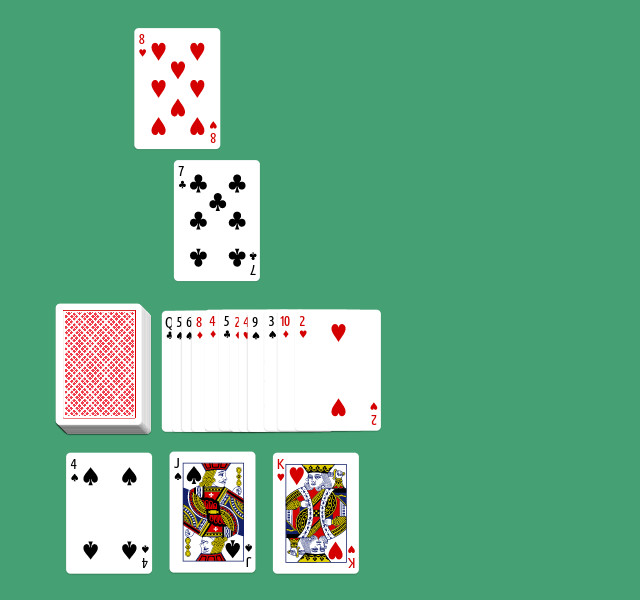
The Skeletons have a Might of 6. The 8 damage is enough to defeat a skeleton. That's what I will do! I play the 10♦ to defeat one of the skeletons. I move the skeleton represented by the 2♥ to the discard pile and draw a new card (K♥) for my tableau.
3. Defending ♦ Against Monster Attacks
The skeleton represented by the 7♣ is in the threat area and attacks. The best effort that I can achieve with the cards that I have is 7. (5 for either of the Royalty (face cards) +2♦ for my armor.)
That's not enough to match the Skeleton's menace of 8. I play my lowest card, the 4♠ and draw a new card (J♣) for my tableau.
4. Resolve Damage
I did not successfully defend against an attack against me. I must suffer damage. To do this, I must select one of the cards in my tableau and flip it face down. The card still takes up a space in my tableau, but I cannot play a face down card. The J♣ is good for the Crossing ♣ action, and the K♥ is good for the Hitting ♥ action. I flip over the J♠.
5. Monsters Move
Two skeletons remain. I begin with the skeleton represented by the 8♥ currently in the shadow area. I draw a 6♥ - red. The skeleton moves to the threat area. Now for the skeleton represented by the 7♣. I draw a 8♠ - black. That skeleton moves to the shadows.
Example - Round 3
1. Crossing ♣ (optional)
I like the cards in my tableau and the skeletons are right where I want them. So, I skip this optional step.
2. Hitting ♥ or Shooting ♠
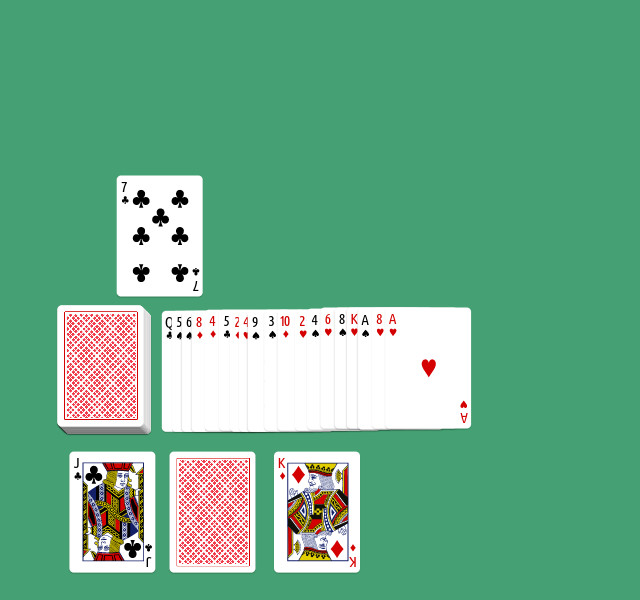
I've been waiting for the chance to Hitting ♥ using a trump card. I play the K♥ and flip over the top card of the deck. I get the A♠. Both the A♠ and the K♥ are Royalty. All Royalty is worth 5 each, together they give me 10 effort. To this I add the +2♥ Hitting bonus for my club, bringing the total effort to 12.
Subtracting the skeleton's menace of 8 from my total effort of 12 leaves 4. Just like before this damage is doubled, bringing the total damage to 8 and destroying the Skeleton.
I discard the 8♥ and draw a new card to bring my tableau back up to 3 cards. I draw the K♦. I would have preferred another heart (or a really high numbered card.) But, the K♦ is good defense. So, I am feeling confident.
3. Defending ♦ Against Monster Attacks
No monster attacks since the only skeleton left is in the shadow area.
4. Resolve Damage
Since I was not attacked, I have no damage to resolve.
5. Monsters Move
I draw a A♥ - red. The skeleton moves to the threat area.


No comments:
Post a Comment